
It’s hot in Florida and most Morgan outings are top down. But when it rains, and it does that daily, you have to put the top up. Being in a Morgan with the top up, in Florida, is hot, very hot and humid. But, I have air conditioning in the Roadster. Yeah, right!
Well, the Roadster air conditioner is the subject of many jokes, and none of them are good. If Morgan didn’t provide air conditioning, we would have suffered on, as we had before, but since the car supposedly came with ‘Air Conditioning’ we thought we were saved. Not so. It doesn’t work and if it does, it doesn’t work very well.
Turning On the 2005 Roadster Air Conditioning
The actual air conditioner lines are high pressure lines and are metal.
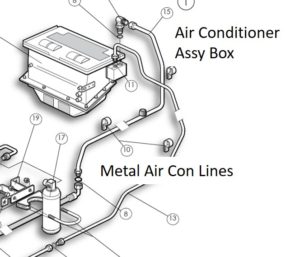
They go into an air condition assembly box on the car’s firewall. This assembly box also houses the car’s heater core (sort of looks like a small radiator) and the heater / air conditioning fan. The assembly box is covered with some sort of temperature insulating material that is silver-ish.

There is a knob about the size of a nickel near the upper right corner of the air condition assembly box (labeled as Condenser Knob, above, and shown as a red dot.) This knob is supposed to be fully rotated clockwise. This insures the air conditioning ‘compressor’ is not turned OFF. It is rumored that some cars simply had this knob set somewhat counter-clockwise and the air conditioning didn’t work.
Also, inside the car, there is large rotating knob under the dash on the passenger side (LHD) that goes from Hot (Marked in RED) to Cold (Marked in BLUE). There is also a switch under the dash on the drivers’ side (LHD) labeled with a snow flake (for air conditioning). One side of the switch shows a vertical bar ‘|’ for ON and the other an ‘O’ for OFF.
- Rotate the ‘compressor’ knob (the small knob on the outside of the air conditioner assembly box.) fully clockwise.
- Rotate the large knob (inside the car, under the dash) to the BLUE side
- Turn the air conditioning switch (inside the car, under the dash) to the ON position (e.g. with the vertical bar ‘|’ for ON).
- Turn on the fan switch, which is inside the car, on the dash, to low or high. (It is a two position switch.)
When I do all this, I get semi-cool air blowing into the cockpit. Certainly, insufficient for the Florida heat and humidity. It is not new car cold air, more like really old car cool air (someone said tepid).
So What Now?
I tried starting the air conditioning a few times, hoping for a different outcome each time. Nope the same each time, nadda, still tepid air.
I studied the schematics and stared at the car. I found a few things I thought I could do. There are two coolant hoses taking hot coolant from the engine, running it through the heater core (little radiator) to provide the heat for the heater. (They are shown in purple in the schematic above.)
The fan (switch to turn the fan on and off is located on the dash) blows air through this hot heater core into the car’s cockpit. The air blown by the fan comes from the hot engine air leaving the forward bonnet louvers and then goes back into the engine bay via the rearward (near the windshield) louvers on the bonnet. This air then goes into the top of the air conditioning assembly box.
This is the air that is used by the heater / air conditioning systems. Hot air is fine for the heater but isn’t too good for the air conditioner.
Also, having these hot coolant lines and this hot heater core in the air condition assembly box cannot be good for getting cold air into the cockpit either.
Fixing the air flow looks to be somewhat arduous, at least in my simple mind, however eliminating the hot coolant hoses feeding the heater core looks doable. So that is what I did.
Tools Needed
All this is really just to loosen and tighten hose clamps. Your car may have different hose clamps and require different tools. Well, the pry bar gave me some leverage with sticky hoses.
- 1/4 inch drive ratchet
- 6 inch extension for 1/4 inch drive ratchet
- 7mm Socket (1/4 inch drive)
- 8mm Socket (1/4 inch drive)
- Slotted Screw Driver
- Philips Head Screw Driver
- Pry Bar
- 90 degree ¾ inch (outside diameter) brass hose coupling (~$3 at Lowes)
Steps
The hardest part of this task is getting access to the heater core supply and return coolant hoses where they connect into the air conditioner assembly box. Once you have access it is simply the matter of removing the two hose clamps that hold the hoses on the air conditioning assembly box and then joining the two hoses together with a 3/4 inch coupling.
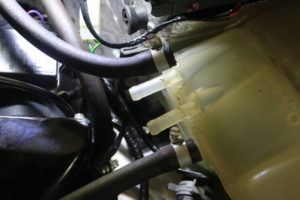
- Remove the two small overflow tank hoses. Remove the hose clamps using slotted screwdriver. See picture of overflow tank with hoses removed, below.
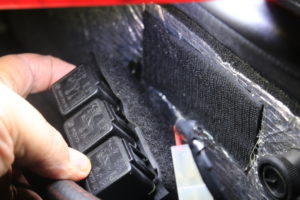
- Relocate electrical relays attached via an attached Velcro patch. Simply pull Velcro away. See picture of velcro on electrical relays and on air conditioner assembly box, below.
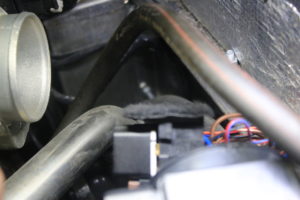
- Remove the large Air Flow hose. Again, remove the hose clamps and pull. The hose is fairly pliable. See picture of the void left when the the large air flow hose is removed, below.
- Now you can access the two hoses going into the air conditioning assembly box that carry the hot coolant water. Note: When you pull these away, you will have some spillage of coolant as the heater core is most likely full. It isn’t very much however.
- Simply connect the two hoses together using the metal coupling (I tried it with a straight coupling and it was too difficult to get the hoses in the correct position, so I opted for a 90° angled coupler. This was much easier.) I found the coupling at the local home improvement store. I suspect they are everywhere. This removes the flow of hot coolant from the heater core and of course, disables the heater. Now just put everything back.
- Put the large Air Flow hose back on. Again, use the hose clamps on each end and push and pull to get it set on each end. Then tighten the hose clamps.
- Put the electrical relays back onto their Velcro patch.
- Finally, reconnect the two overflow tank hoses.
- Re inspect to make sure everything is reconnected and tightened up.
- Take the car for a test drive.
The Result
I think this simple modification greatly improved the performance of my air conditioning. It is still not extremely cold, but it is quite a bit cooler than before. Now, I suspect everyone’s car is different (these are Morgans, of course) so your results may vary. I also think that reworking the air flow, as discussed above, will improve the air conditioning some more.
I believe a more elegant solution that addresses not only the hot coolant hoses, but also the hot air flow issues and a solution that doesn’t disable the heater, is in the works. I will probably opt for that solution when it is here and tested, however until then, this is about ‘as good as it gets’.
Cheers, Mark
Leave a Reply to John Cancel reply