
[I can’t vouch for the accuracy or completeness of this article as I haven’t as yet had to muck with my Plus 4’s SUs. I have done business with Burlen and have found them acceptable as a vendor. I have also done business with Joe Curto and I am a fan. Cheers, Mark]
No matter what the name on the valve cover, so many British classics rely on the ubiquitous SU carburetor: Jaguar, Triumph, MG, Rover, Rolls-Royce, Bentley, Morris, Austin, Sunbeam and so many more. And not only did almost every British manufacturer specify SU carburetors, but so did other companies.
Volvo and Saab also used them, while Hitachi-built versions of the SU were used by Datsun.
Sure, Webers may be sexier and have more racing titles to their credit, but for normal use these SU carbs work well. While some people are quick to cast SUs aside and look for an upgrade, a little understanding and mild tuning can go a long way, whether the goal be increased performance, better drivability, or improved fuel economy.

How They Work
Based upon a principle developed and patented by George Skinner in 1905, the SU (as in Skinners Union) carburetor changed very little until emissions regulations pretty much made them obsolete about 30 years ago.
The SU is about as simple as a carb can get: it has very few moving parts, usually only one fuel circuit, and far fewer springs, balls and other complicated pieces than conventional carburetors.
All carburetors make use of the venturi principle. Daniel Bernoulli, an 18th-century Swiss scientist, used a venturi, a tube that is narrower in the middle than it is at either end, to discover that as the velocity of a fluid increases, its pressure decreases. As the air and fuel pass through the venturi’s narrowed passageway in a carburetor, the mixture speeds up; the resultant drop in pressure is what causes the fuel to atomize.
The SU employs this principle differently because it varies the size of the venturi. Hence, the SU is called a variable venturi carburetor and is grouped with those built by Stromberg, Predator and Amal. In the center of the venturi is a piston with a tapered needle affixed to its bottom side. The piston has holes positioned in it so that as air is sucked through the venturi, vacuum above the piston makes it rise. When it rises, not only does more air flow to the engine, but the needle allows more fuel to flow from the jet below. The needle is a precision piece, with nine to 16 specific diameters measured during the manufacturing process to ensure proper fuel flow throughout the range of air flow to the carb.
Thus, the SU self-adjusts to the air/fuel requirements of an engine. It only flows as much air as necessary, and the tapered needle ensures that a proper fuel mixture is obtained at any air flow. This self adjustment needs a little help at two times: During cold starting and hard acceleration, when a richer-than-normal air/fuel mixture is needed. SUs handle these two situations differently, but again use very simple means. Cold starting any engine requires more fuel in the mixture. With conventional carburetors, this is done by limiting air intake, or choking the mixture. SU carburetors do the opposite, increasing fuel flow to richen the air/fuel mixture without limiting air flow. Most SUs do this by lowering the jet, which allows more fuel to flow thanks to the needle’s taper.
Conventional carburetors use an accelerator pump to squirt more fuel into the mixture on hard acceleration. Again, SUs take a different tack. The piston/needle assembly is damped via a plunger in an oil-filled tube, forming a sort of shock absorber for the carburetor. The damper slows and smoothes the movement of the piston. On hard acceleration, vacuum that would otherwise quickly lift the piston is redirected to quickly suck more fuel out of the jet. As the piston slowly continues its rise, the mixture returns to a more normal ratio.
Basic Tuning
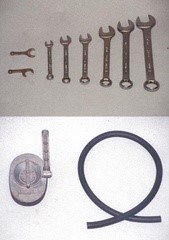
A set of British wrenches and SU jet wrenches (top) are useful tools when working with SU carburetors. These are available from most British car suppliers for relatively low cost.
Assuming that the carburetors are in good condition and have properly sized needles in them, the tuning procedure is not as complex as most people think. However, before the carbs are touched, ignition dwell and timing must first be correct. It’s a good idea to ensure valve clearances are correct as well. A quick check for vacuum leaks is next, and only once this is done is it time to move on to the carburetors.
Next, if there are two or more carburetors, they need to be synchronized. This can be done with either a dedicated synchronization tool or a short length of hose. With the engine running at idle–usually 600 to 1000 rpm–the synchronization tool is placed over the inlet of each carburetor to get a reading on its gauge. The idle screw is adjusted on each carburetor until each one gives the same reading on the synchronization tool. The low-buck method is to substitute a 12- to 18-inch length of 1/4-inch or 5/16-inch hose for the tool. Hold one end of the hose up to the air inlet of each carb and the other end to your ear. When each carb emits the same noise through the hose, they are synchronized at idle. (Note that revving the engine slightly and periodically throughout the adjustment process helps to “clear out” the carbs.)
After the carbs are synchronized at idle, the throttle linkages can then be adjusted to ensure they remain synchronized throughout the rpm range. With just a little free play in the linkage, each throttle arm should start moving at the same time when the accelerator pedal is depressed. If not, the locking nuts can be loosened to adjust the linkage. The idle mixture is set next. The conventional method, which is published in most manuals, works very well. First, each piston is lifted slightly, about 1/16-inch (usually a small screwdriver is helpful for this step). If the engine speed falls off, the mixture is too lean and the jet is lowered via its adjustment nut or screw. If the rpm rise, the mixture is too rich and the jet is raised. If raising the carb’s piston causes the engine speed to rise by about 50 rpm before returning to its previous level, the mixture is just right.
An alternate method is to use a vacuum gauge and adjust the mixture in each carb to get the highest vacuum at idle that is possible. At this point, the idle speed can be verified to be correct and the tuning is nearly done. All that is left is the “choke” adjustment. As discussed before, SUs don’t really have chokes, as they richen the mixture instead to allow smooth engine starting. This is usually accomplished through a linkage and cam that lowers the jets and raises the idle speed. The linkage and cam only affect idle speed in the first two-thirds of the distance of choke cable travel; it increases the air/fuel mixture as well as the idle speed during the final third of travel.
The two steps to adjustment are to ensure that multiple carb setups have proper linkage balance between carbs, then to set the high-speed idle screws that touch the cams. High speed idle is usually around 1800 rpm.
Rebuilding Old Carburetors
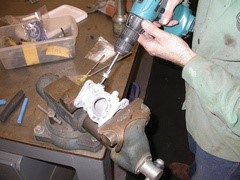
Replacing the throttle shaft bushings requires reaming out the old bushings, installing new bushings, and reaming the new bushings to size.
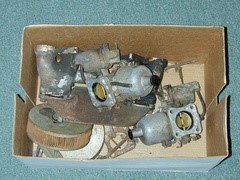
If you look at the sidebar on common problems, you’ll see that most problems related to SU carbs are due to wear or age. SU carbs are pretty easy to rebuild as there are relatively few parts. Additionally, there are many competent rebuilders who can bring these carbs back to as-new condition for a reasonable fee–figure $50 to $75 to rebush each carb’s throttle shaft and $350 to $500 to completely rebuild a pair. Polishing all of the external parts can add another $100 to $200 to the rebuild cost. Except for throttle shaft bushing replacement, most enthusiasts can carry out repairs at home. Throttle shaft and bushing condition are paramount to tuning an SU, and there are three common solutions for fixing worn parts. One is to replace only the shafts. If the old shafts aren’t too worn, the bushings probably aren’t too worn, and new shafts will go a long way to stopping vacuum leaks. The second repair is to ream out the bushings 0.010-inch and install oversized shafts. This is a cost-effective solution, but can only be carried out once. The third method is to completely remove existing bushings and install new ones, then replace the shafts with standard ones. As can be expected, there are increasing requirements in terms of the cost, skill and tools necessary for each of the respective steps.
Many rebuilders will replace these components and let you do the rest of the rebuild. The rest of the rebuild entails replacing the jets and needles in the carb bodies and piston assemblies, the needle and seat in the float bowls (and floats if defective), and replacing gaskets and rubber pieces. For the car-show crowd, all cast parts should be glass-beaded. It is then usually a good idea to get the linkages and hardware replated in zinc, and to polish the dashpots (the chambers for the pistons).
If you’re a strict concours type, these were not plated or polished from the factory, but it seems most restored cars get them prettied-up anyway. Don’t want to fuss with old carbs? Brand-new SU carburetors are still available. Depending on the application and vendor, figure a brand-new pair starts at about $550.
Performance Modifications
Comparison of earlier- and later-style throttle disks shows that the later-style disks have a spring-loaded poppet valve, which impedes air flow. Replace these with earlier-style disks in performance.
There are not too many performance modifications necessary or possible for SUs. Aside from changing to larger carbs, about all that can be done is to change to needles with a different taper and make modifications to increase air flow around the throttle disk and shaft. Most SU specialists carry a range of needles for changing the mixture characteristics throughout the range of air flow. While the fine-tuning of needles can be an onerous process, there are generally just a few categories of standard needles available. Labeled weak, standard and rich, they provide the levels of performance and economy their names imply. While there are more than 800 needle profiles available, many tuners will just make up their own profile by chucking the needles into a drill press and then using fine sandpaper to sand in the profile they like. Of course, they spend a fair amount of time with a micrometer to ensure they’ve narrowed the needle (richened it) the right amount.
Filters and velocity stacks can make a difference in performance. Usually, K&N filters are worth one or two horsepower. TWM’s velocity stacks can also offer a couple of horsepower, but usually cannot be effectively run with an air filter. Finally, small improvements can be made to the carbs by improving air flow around the throttle shafts and disks. Carbs built after about 1968 feature throttle disks with a spring-loaded poppet valve that improves emissions, but the valve also impedes air flow. Fortunately, earlier flat disks can be fitted. For the radical tuner, the throttle shafts can be thinned and ovalized for an extra CFM or two of flow.
Why Keep Them? So, why not just go to a Weber carburetor? For some, that’s a good solution, but many are bound to their SU carbs thanks to racing regulations. And then there are those who believe that properly set up SUs can perform just as well as Webers on the street, but with easier tuning and better manners. In fact, we’re in the middle of dyno testing SU and Weber carburetors. Look for our findings soon.
![]()
![]() New Vs. Rebuilt
New Vs. Rebuilt

Before you buy that box of carb parts, first price what the rebuild is going to cost. In some cases, you may want to consider new carbs instead.
Burlen Fuel Systems, the company that owns the rights and tooling to SU carbs, still makes and sells brand-new replacement setups. Available for most common British classics through the big suppliers like Moss Motors and Victoria British here in the U.S., these new carbs can be an excellent option. However, the new carbs are not identical to the ones they are replacing. In most cases, many of the parts have been updated and thus are not interchangeable with the originals. As a result, if you go with these new SU carburetors, you won’t be able to use the standard replacement parts.
We’ve also seen a few easy-to-overcome quality problems with the new carbs, like choke linkages needing slight bending to work properly. How do you decide whether to go new or rebuilt? Consider your goals and budget. If you have a common setup like an MGB with HS4 carbs, then you may find the new ones not only a good option, but cheaper than a professional rebuild. For example, a pair of brand-new HS4 carbs will set you back about $550 to $575.
A concours-quality rebuild can cost about $600 to $700. (If refinishing the external parts is not needed, knock about $100 or $200 off that figure.) On the other hand, sometimes it’s more cost effective to rebuild the originals. New HIF4s run about $1000 per pair, while again it’s about $600 to $700 to rebuild them to concours condition. (Forgoing the polishing and replating work can save about $100 to $200 here, too.) If “concours correct” is your goal, then there’s really no question and you’ll need to rebuild the original ones. (Don’t forget, however, that your car will be down while the carbs are sent out for a rebuild.)
Can’t decide whether to go with new or rebuilt carbs? Let your budget, situation and goals guide you. ###Size Matters: Identifying SU Carbs SU carbs come in several styles and sizes. Fortunately, there is a system for understanding the size of the carbs. Each carb is identified by one or more letters and numbers. The first letter is an H or a V, which stands for Horizontal or Vertical. The SU carbs commonly used on European cars are all of the horizontal design. The next letter will describe the physical characteristics of the carb and usually describes the float chamber location: S stands for Side float or Short body, depending on which expert you call; IF stands for Internal Float; and D stands for Diaphragm jet.
The numbers require an understanding of fractions, as they indicate how many eighths of an inch over 1 inch the carb’s throat size measures. So, an HS4 carb is 1+(4×1/8) inches, or 1 1/2 inches. To put this together, an HIF4 (common MGB carb) is a horizontal, internal float, 1 1/2-inch carb. An HD8 (common XKE carb) is a horizontal, diaphragm type, 2-inch carb. An HS2 (common to Spridgets and Minis) is a horizontal, side float, 1 1/4-inch carb. One exception to the “fraction” rule is the more modern HIF44, common to newer Minis. It is also called a “metric” SU because the float is measured in millimeters. (In this example, the horizontal, 44mm internal float measures about 1 3/4 inches across.)
In addition to size and type, there are a few other things to consider before you start buying used carbs on eBay. Some carbs have vacuum fittings, some do not. Carbs are often configured in sets of two or three and need to be kept in order for linkages to work. HS carbs may also have different float bowl angles. For example, Spridgets are 20 degrees, while Minis are 30 degrees. If you had to pick from the various models, the HS version is probably the best one to go with, followed by the HIF models. The earlier H type carbs are pretty good but suffer from faster wear in the choke linkages and are a little more prone to leaks from the float bowls. HD carbs are more complicated, with a separate idle circuit and diaphragms inside. HS and HIF carbs aren’t perfect, either: HS models are very prone to throttle shaft wear, while HIFs don’t tend to wear at the throttle shafts, but are a bit more complicated and have more of a tendency to overflow if they get dirty.
How many carbs should you run? For most performance engines, one carb for every two cylinders works pretty well. How big? Unless your engine is pretty heavily modified, you’ll probably do best with the stock size that came with the car. If you need a little more, jump up a quarter of an inch. If you’ve got a full-race engine with an excellent breathing head, go up half an inch.
Leave a Reply to Rick Cancel reply